
Shape of a lateral incisor

The hardest tooth to design in the mouth IMO is a lateral....
I thought I would give a couple tips to help with some common mistakes that I see with the planning and design of lateral incisors:
- Try to keep the lateral a little bit more triangular in shape
- It should always be inclined to the mesial (long axis) AND the rotated to the distal compared to the central. I hope this makes sense...the midfacial should not be coming right at you like the central, it should be pointing slightly distal.
- The Mesial line angle should be positioned more toward the center of the tooth than you might think (bigger mesial grind zone for those who have taken Level 4)
- It should be positioned on a facial plane slightly more lingual to the Central and the Canine (The distal lobe of the Central should be prominent over the mesial of the lateral)
- The mesial incisal embrasure should be larger than the Embrasure between the Centrals. The Distal incisal embrasure should be even larger than the mesial
- If you have space issues, always open up the distal incisal embrasure of the lateral to solve the spacing issue. Will help you maintain correct proportions
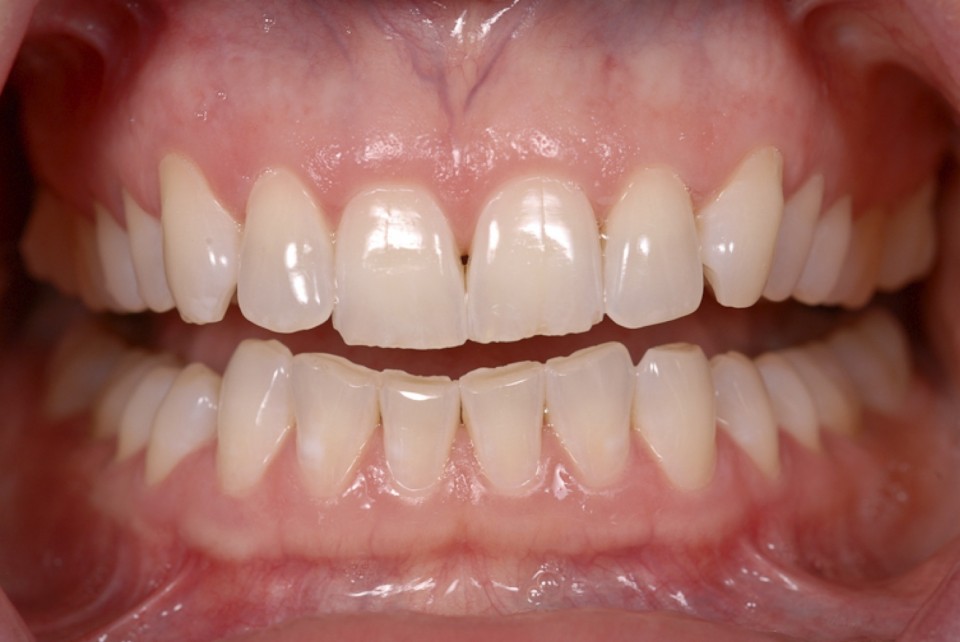
And here is a crown on #7 to illustrate this concept:


I still do most all of my anterior work in Biocopy at this point. Keep these 6 "checkpoints" in mind when doing your mockups or communicating with your lab for a diagnostic waxup. Hope it helps!

MIke - Great Post! Great Tips - Thank you.
Its the little things, the tips and tricks, that make dentistry fun and exciting.
We so appriciate your dedication to Cerec and to Us!!!!
Greg
On 7/7/2015 at 6:25 pm, Gene Messenger said...Mike all your work looks BEAUTIFUL!!!!!!
Thanks Gene... I'm obsessed with learning how to do anteriors as good as the best technicians. I have some great mentors that have been willing to help me and so I'm trying my best to help you all as well. I've been working on Photography a lot lately too... my poor staff has had 100's of pictures taken of them the past month..LOL
Here is a picture to visualize how the mesial inclination should look

And here are the golden proportions. When measuring and analyzing this case for the mockup, I realized that #10 is not actually in proportion. Here you have a decision to make. Do you copy an unproportioned (a bit wide) #10... or do you make #7 in proportion? The key IMO to a smile is the Central incisors. They have to be as symmetrical as possible for the case to look excellent. The laterals are not that way always. You can have some asymmetry in the proportions (minor) and still have the case look good. If fact, sometimes small little discrepancies make a case look natural. So, given this decision, I mocked up #7 to be within the golden proportions and not wide like #10


Mike,
Excellent information that will help all of us.
I am interested in knowing how you created the golden proportion template.
Do you do that in elements or in Keynote?
Also can you explain Point #3 a little more. Did you mean that the mesial line angle should be more distal than you think?
On 7/7/2015 at 10:33 pm, Dhaval Patel said...Mike,
Excellent information that will help all of us.
I am interested in knowing how you created the golden proportion template.
Do you do that in elements or in Keynote?
Also can you explain Point #3 a little more. Did you mean that the mesial line angle should be more distal than you think?
Thanks Dhaval for clarifying #3... it should be distal. I changed it above to say "more toward the center of the tooth"
The templates that I made and used are in the download section. I made them via Keynote and use them in photoshop. Here is a quick video on how I did the picture above. Just drag the template into photoshop and manipulate. If you drag the corners, the proportions will not change.

Purchase a Resident Membership
to watch the full version of this video plus hundreds more. Subscribe Today
Great Tips Mike, and I enjoyed the video....but where can I download the Golden Proportions png? I searched our site and could not find it....
Many Thanks!
Michael
On 7/9/2015 at 6:35 am, Michael Ellis said...Great Tips Mike, and I enjoyed the video....but where can I download the Golden Proportions png? I searched our site and could not find it....
Many Thanks!
Michael
Downloads, Clinical Applications, Smile Design Templates
