
 Darin O'Bryan, D.D.S.
 Here is a little device that I use when I am design and anterior case from scratch. Most of the time we are doing cases in biogeneric copy using a wax up. But there are times that you don't want to use a wax up. With the wax up you already have the incisal edge and the midline taken care of. Also the alignment of the incisal edges anterior posterior. However, when you don't have a wax up we need a way to transfer that information to the software.
When I do an anterior case without a wax up I use two extra catalogs. The first is a gingival mask catalog to know exactly where the gingiva is pre preparation. I wrote about this previously in this blog. https://www.cerecdoctors.com/discussion-boards/view/id/39263/use-of-gingival-mask-in-anterior-esthetic-cases
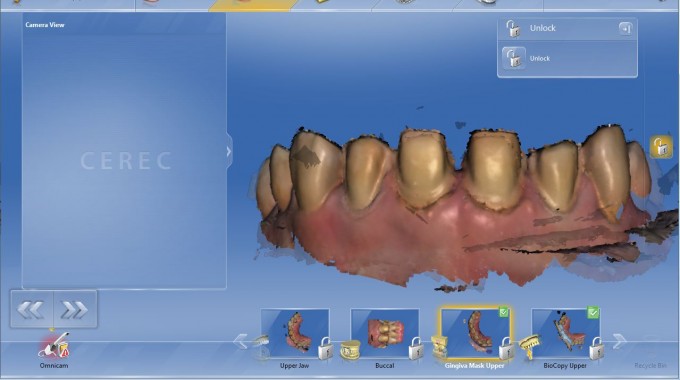
The other catalog that I use is a biocopy. This is used to transfer a horizontal stick that registers the inter pulpallary line or the horizon which ever you are trying to replicate. You can also mark it with a sharpie marker to have the midline designation showing on the bite registration material. If you carry it over from the facial to the incisal area it will show up on the model axis not only from the front but also when looking down on the model axis. I only do this when the anatomical markers for the midline are not evident or do not coinside with the desired midline.
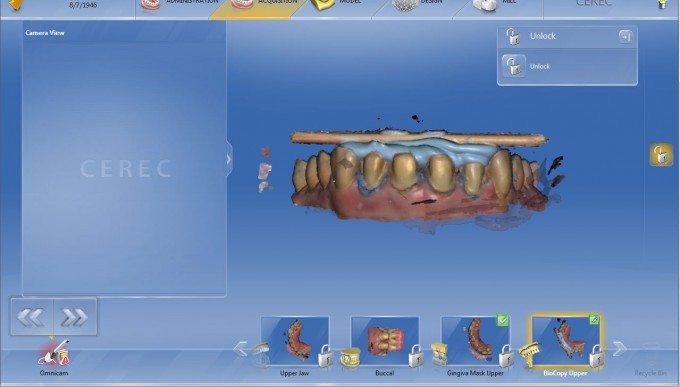
The trick here is to use as little PVS material as possible as to not obscure the teeth to use as a reference and get the biocopy to stitch. Be sure to care the scan for both the upper arch and the biocopy past the teeth being prepared at least two teeth. This with the facial preparations being imaged should give you enough for a stitch. Once this stitches you need to set the model axis properly.
When you set the model axis you want to set the stick along the horizontal line but also along the horizontal rotational axis. This is assuming you have the stick aligned with the desired incisal edge postion. When setting this in the model axis generally this will also mean that the canines or bicuspids will be positioned simliarly in relation to the outer edge of the arch diagram. 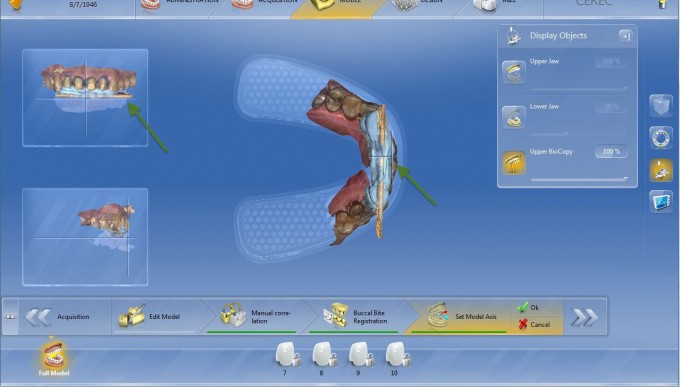
Once this done and you have your proposals you can bring the image to center by hitting the global position tool and hitting front. This gets you to the facial view based on your model axis which will give you the horizontal line parallel to the interpupallary line but also the correct rotation as to not cause a shift in the model along the rotational horizontal axis. You can check the accuracy of this by bringing up the biocopy. This way you can see where the horizontal plane is in relation to your proposal and adjust accordingly.

Once you have the grid mode and verified that the paralleling stick is even with the grid you can turn off the biocopy and just have your proposal set along the incisal edge. If it is off at all you can either go back to the model axis and correct or you can position the horizontal along the grid mode to set your incisal edge. If you don't correct in the model axis you will have to verify with the biocopy and grid mode any time you move the model and want to check the incisal edge position. Most of the time once I have the incisal edge position and the midline I don't touch them so going back to the biocopy is not necessary. If it is correct in the model axis I can just hit Global->Front and the model will be positioned in exactly the same position along the incisal edge with the correct horizontal rotation as well to assess my desing.
