
Fully Digital Upper Arch
Those of you that were at my lecture in Vegas at DSW 2017 saw me do some bigger cases digitally. I thought I would post a case that I just finished that shows this workflow
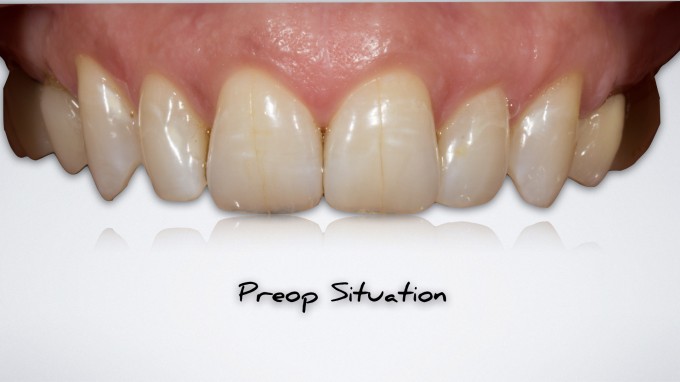
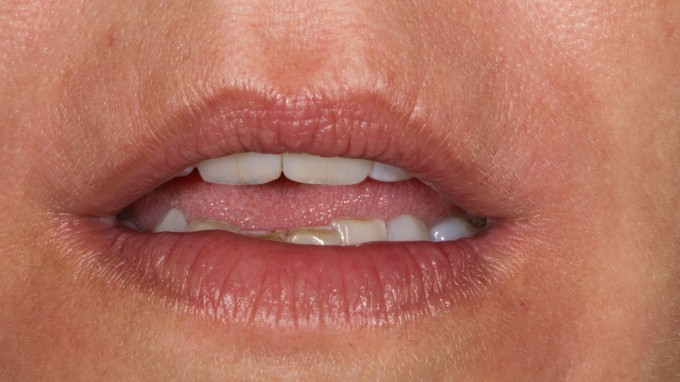
I have seen this patient for some time and she has always told me that she does not like her teeth. She is mostly unhappy with 3 things:
- The lines and discolorations in her teeth
- The shape of her teeth (specifically #7)
- Tooth #9 was more facial than tooth #8
- The open incisal embrasures between the canines and the laterals
- The minor collapse of the buccal corridor
- The unesthetic crowns on #3 and #14 (recession and margins that showed)
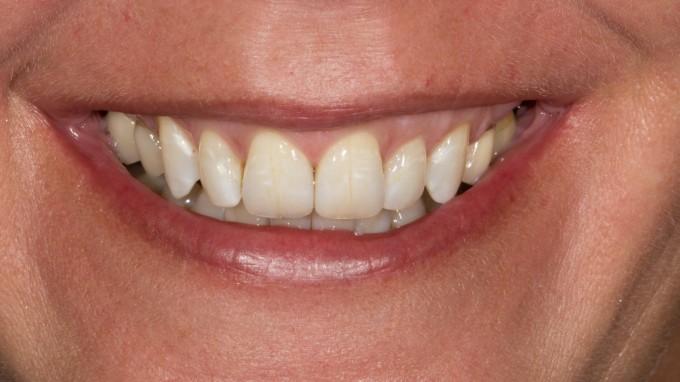
To give you an idea what she was seeing, here is her smile:
I knew that we didn't need to change a lot...She had a very normal tooth display at lip at rest for a 46 year old woman:
I think it's important to REALLY talk to the patient about what they want so you are clear when designing the case. She made several requests including the following:
- She wanted her concerns fixed, but didn't want people to know that she had fake teeth. This meant a very natural shape that almost mimicked what she had now... just chaning the shape and buccal corridor a little bit
- She didn't like the "blue" at the edges... which means I have to watch the incisal effects
- She wanted a natural shade... nothing bright. More natural
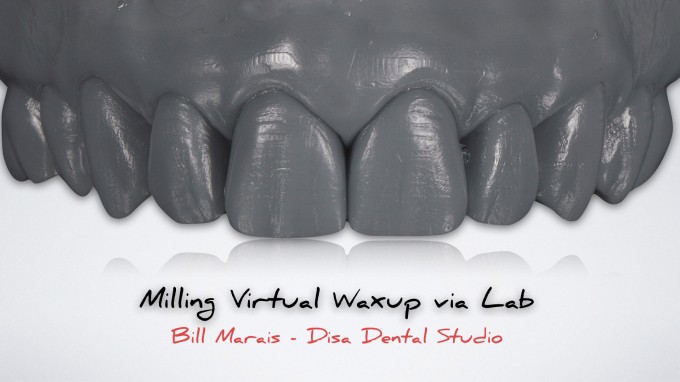
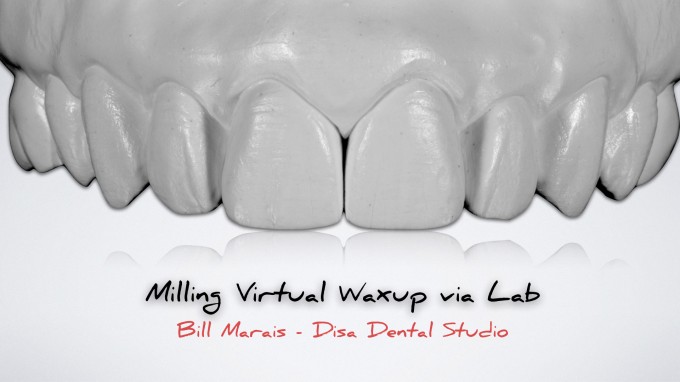
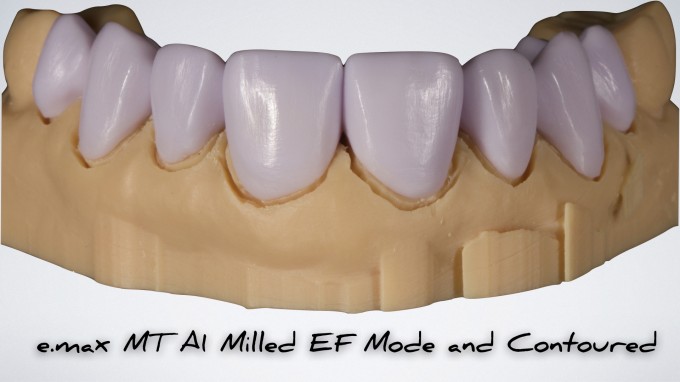
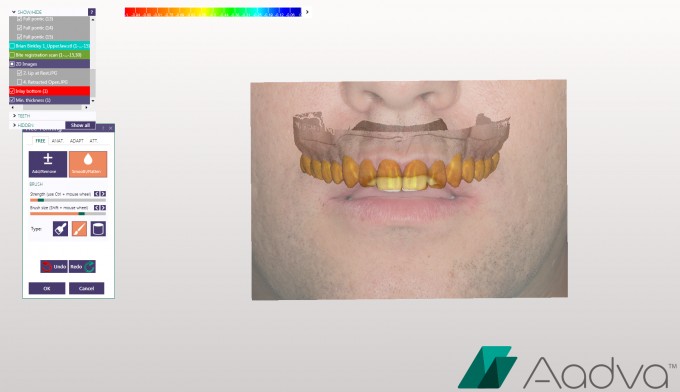
So I took this information and scanned her with the Ortho software. I exported the scan to my lab technicial Bill Marais and he digitally designed the smile via Exocad. Now often times I will have him send me the case via .stl and I will 3D print the case and use as Biocopy. In this case we did more of a "hybrid" approach in which he "milled" the digital waxup on a 5 axis mill with a grey "puck" and then used his hand skills to define certain areas. We did this because I wanted details and it's difficult to get this kind of detail via 3D printing.
Next we duplicated in white stone just in case... I use this to make a Copyplast matrix for a reduction guide, to transfer the waxup to the mouth for depth reductions, and also to fabricate provisionals.
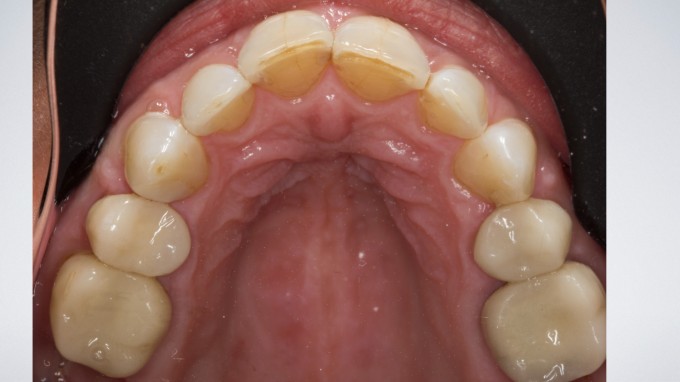
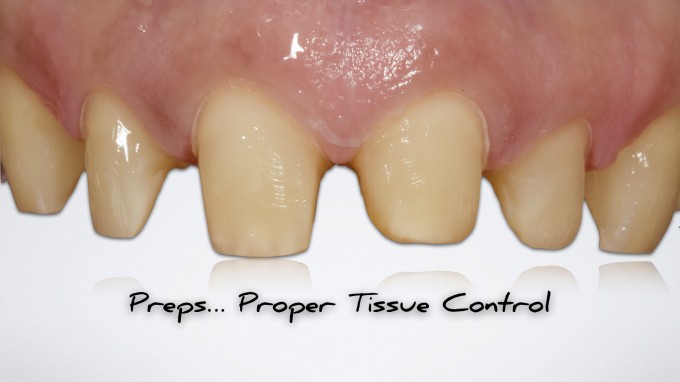
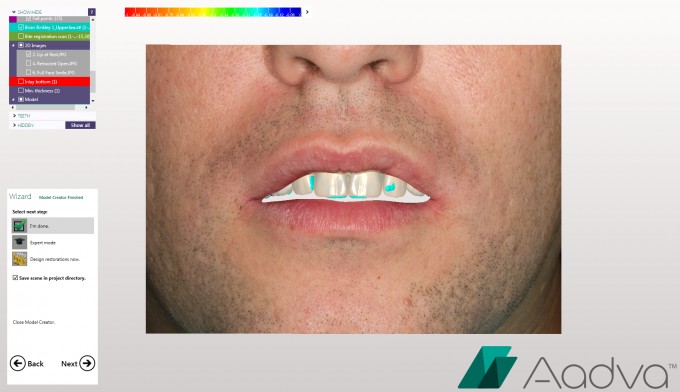
We went ahead and prepped the teeth. We made the decision based on the waxup to prepare more of a full coverage veneer type prep. We tried to keep everything in enamel as best we could due to this prep style. We prepped a little more based on the decision to move the teeth slightly lingual in the anterior. This also helped us control the function:
Tissue control is very important. I don't like dealing with inflammed gingiva so one tip is to make sure you pack cord prior to defining the margins so you protect the gingiva:
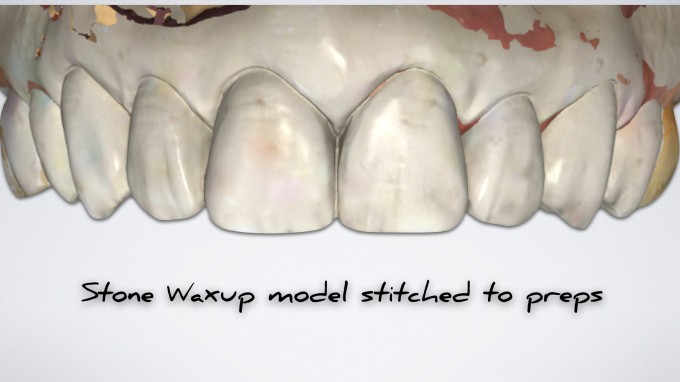
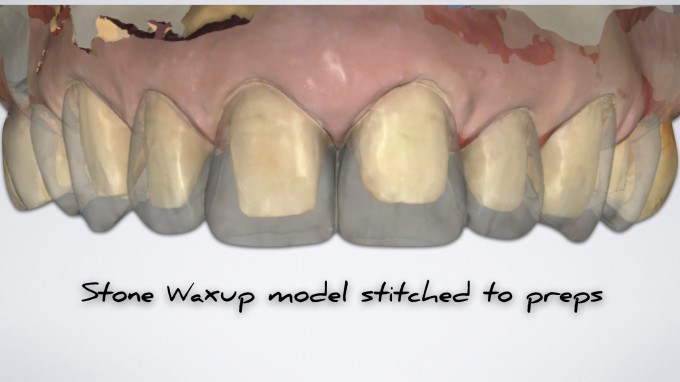
IMO, it's very important to get the waxup model to stitch with the prepped teeth. This makes a MAJOR difference in how easy the design is and how much closer it will replicate what you are trying to execute. For this reason, we left the molars intact (no waxup on these teeth either) and use them as stitching abutments to correctly overlay the waxup to the preps:
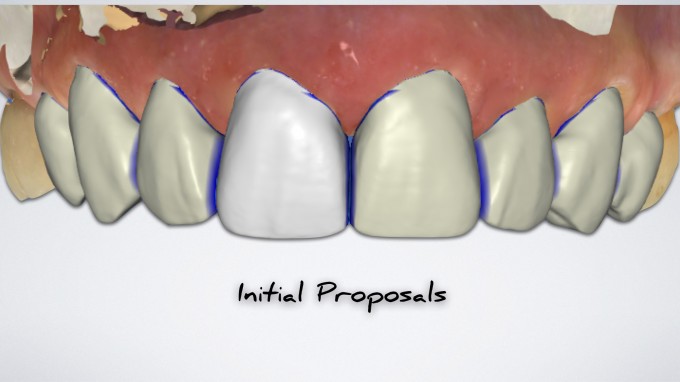
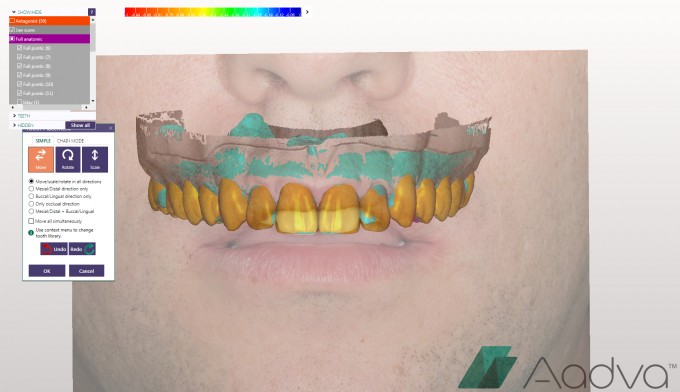
By doing that, here are our designs.. initial proposals took very very minor tweaking (only about 5 minutes)
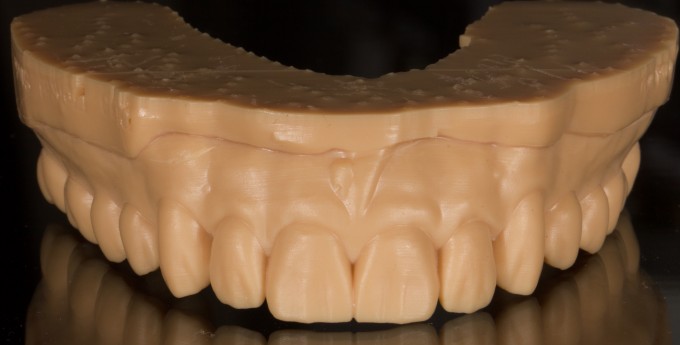
I went ahead and exported the .stl of the preps and 3D printed a prep model. It was a solid model so I manually ditched the margins with a bur to get the restorations to seat. Here are the e.max restorations milled in EF mill (Extra Fine for better trueness):
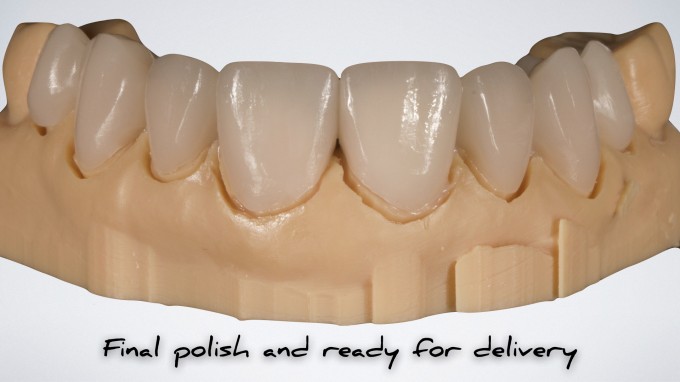
I did some small incisal effects with Ivoclar Ivocolor and then polished the restorations (no glaze). Here they are ready for delivery:
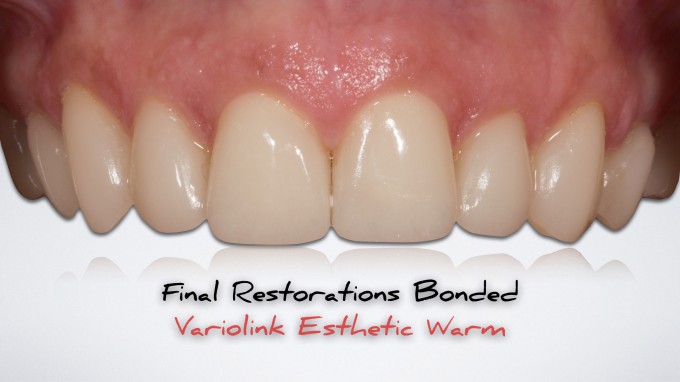
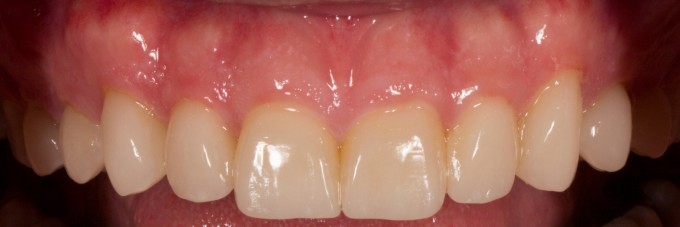
And here are the final restorations bonded into place with Variolink Esthetic warm. She was very happy with the result. I think I could have maybe done a little more contouring (some washed out in the picture)... but shape is always the most important thing and we did what she asked... creating more of a monolithic tooth with a natural shape and natural color:
Really awesome mike. Great workflow. Thanks for continuing to push the limits of the technology.
If you print at the highest resolution would you still lack the texture and anatomy in the design or is it more related to exocad being unable to create that level of detail in the virtual waxup?
Great results. What are the digital benefits of the workflow compared to traditional wax up and stone working model?

do you pass on bill's fee to the patient as a separate line item or present it as one lump sum for the entire case?
On 10/11/2017 at 5:16 pm, Brian Chan said...do you pass on bill's fee to the patient as a separate line item or present it as one lump sum for the entire case?
You can do it either way. The difficulty of building it into the fee is that all cases are different. That is, what if i'm doing just 8 and 9 copying off well contoured PFMs. I don't need a waxup for that. Do you charge the same fee that has the built in waxup?
I prefer to charge the waxup as a separate diagnostic fee to the patient. I explain the benefits to the patient and even show them other cases, etc... so they understand. I tell them it's critical to know where we are going before we start.
We never begin a large case without money down. I generally charge the diagnostic fee (typically ranging from $600-1000) to start the case. This fee is non refundable.
To appoint for the preps, I require 50% down.
Many ways to do this... You just have to do what works for you.
On 10/11/2017 at 5:04 pm, Steven Ozer said... Great results. What are the digital benefits of the workflow compared to traditional wax up and stone working model?
The benefits are:
- No impressions
- No sending things via mail to the laboratory
- Quicker turn around time
- As we feel more comfortable with the workflow, we feel the diagnostic waxup is more predictable because we can overlay the smile, lip at rest, preop teeth, etc...
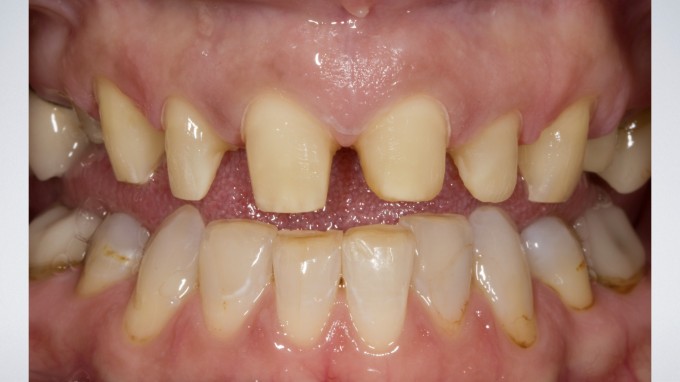
Here is an example of a different case:
On 10/11/2017 at 5:02 pm, Meena Barsoum said... If you print at the highest resolution would you still lack the texture and anatomy in the design or is it more related to exocad being unable to create that level of detail in the virtual waxup?
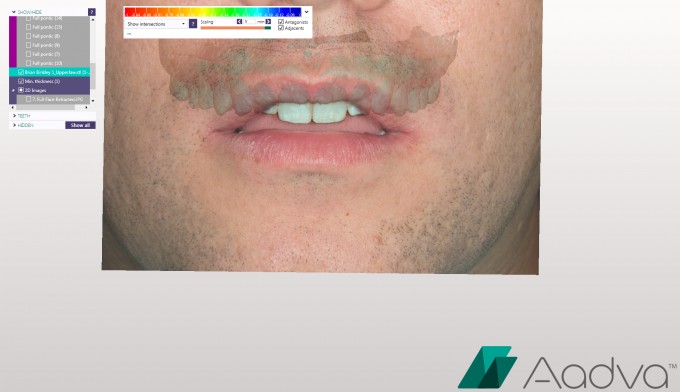
It has nothing to do with the digital waxup... it has everything to do with reproducing the desired detail. Even at 25 micron z axis... you cannot get the detail you can by adding it post print or mill. Our best results so far have been by milling and placing the hand detail. However, it's a work in progress. I have 2 other cases going right now that we are going to do both ways. We have a couple ideas that may work to simplify. We are working out all of this because we are.... doing a new course on this!
Here is an example of a 25 micron print of a waxup (from the above smile design)
We were still thrilled with the final result... but it was a little more work.
This is the finals on that case:

Beautiful case, Mike.
With this many preparations I have usually broken the case up into quadrants or sextants for fear of stitching problems. Your workflow hear is much simpler and cleaner.
What are your tips for stitching big cases like this? When do you feel safe doing the entire arch in one case?
John
On 10/11/2017 at 5:30 pm, Mike Skramstad said...On 10/11/2017 at 5:04 pm, Steven Ozer said... Great results. What are the digital benefits of the workflow compared to traditional wax up and stone working model?The benefits are:
- No impressions
- No sending things via mail to the laboratory
- Quicker turn around time
- As we feel more comfortable with the workflow, we feel the diagnostic waxup is more predictable because we can overlay the smile, lip at rest, preop teeth, etc...
Here is an example of a different case:
Love what you are showing in this case at all levels Mike... particularly like this where the smile design can be more truly represented in our diagnostic workup/photos.... is THIS here going to be part of the new workshop? Can't wait either way....
Mark
Mark-
It will indirectly be involved as far as concepts, but obviously this is not a software that we have so we will not be doing the actual steps in the software
On 10/12/2017 at 9:09 am, John Pappas said... Beautiful case, Mike.
With this many preparations I have usually broken the case up into quadrants or sextants for fear of stitching problems. Your workflow hear is much simpler and cleaner.
What are your tips for stitching big cases like this? When do you feel safe doing the entire arch in one case?
John
We never waxup the entire arch. I leave the molars and do those after the rest of the teeth are finished in Biogeneric. That way you have stitching abutments always available. I'm fine tuning the protocol, but it will be ready soon. Just need to verify with a couple more cases.
Mike, preps are beautiful but seem aggressive for teeth that don't appear to have interproximal restorations. I do see the significant incisal wear that requires a pretty healthy incisal wrap. Is this your typical 3/4 crown prep? I tend to barely break contact on these cases but that does make it more difficult to scan and finish margins.
James-
We had to prep full coverage because we were changing both the position of the teeth and the guidance. Also, if you look closely at the occlusal shot, there are interpromimal restorations on the centrals and laterals.
They were very conservative, almost full coverage veneers. Less than .7mm everywhere except Incisal on centrals and laterals.
I will find a software shot to show you how thin they were. Also, you have to take into consideration the shape of her teeth... very triangular and tapered. If you visualize prepping 1/2mm to 1mm subgingival with a 6 degree taper... it will appear as if more reduction was done than needed when probably it was ideal reduction.

I do see the restorations in the occlusal shot now. The shape of the teeth really do dictate the reduction. I struggle sometimes when I am too conservative on the preps and then end up with interproximal undercuts or thin fins of porcelain. I always use occlusal and facial reduction guides and even then many times my biocopy comes out thin on the facial surfaces. Any change of the facial then leads to losing a lot of the natural contours I worked so hard to produce. The new biocopy is really very good and I do a fair share of my own anteriors using DSD designs.Being both the dentist and the lab makes me think I need to prep slightly more in many cases. Thank you for your explanation and very thorough documentation.
yes... underprepping is my main problem as well. What I do now to try and prevent that is do a quick rough prep, then transfer the waxup into the mouth with Copyplast and Bisacryl, and then do depth reductions again with the Winter Reduction guide... That way, I know i'm reduced properly for my final result... not just on the initial tooth itself. Obviously if it's an additive approach, I will not do the rough prep and transfer first before depth cuts.
Here is one of the centrals cut to show you the ceramic thickness:
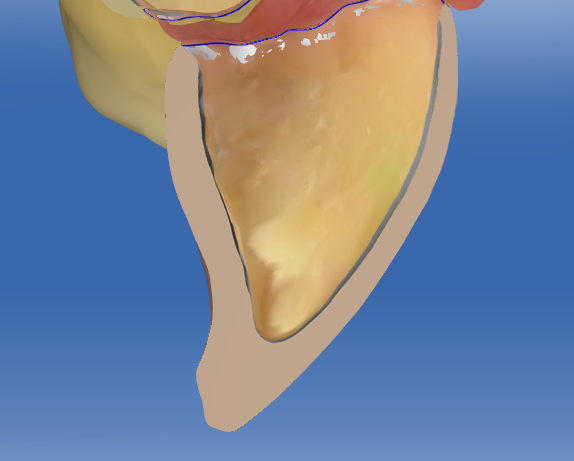
Yes could not have been any thinner on facial. Look how sweet and uniform the gap is on the facial surface. I'll try your technique of pulling in the biocopy on my rough preps. Really should not take long and save you a lot of time in the lab.
So if you do need to prep the molars would you not prep them at first, get the wax up to stick and then go back and prep? Also when would you take your buccal bite?

To make it easier you can design a full arch of wax up, then virtually seat front restorations and export as stl. file, then you can export a full arch. That way you are not loosing any references.
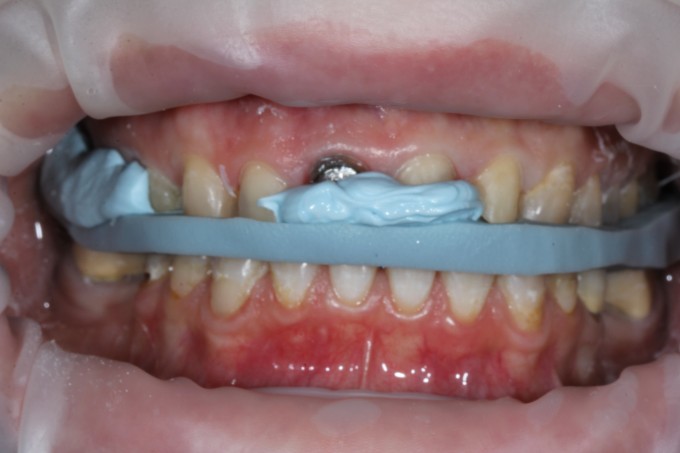
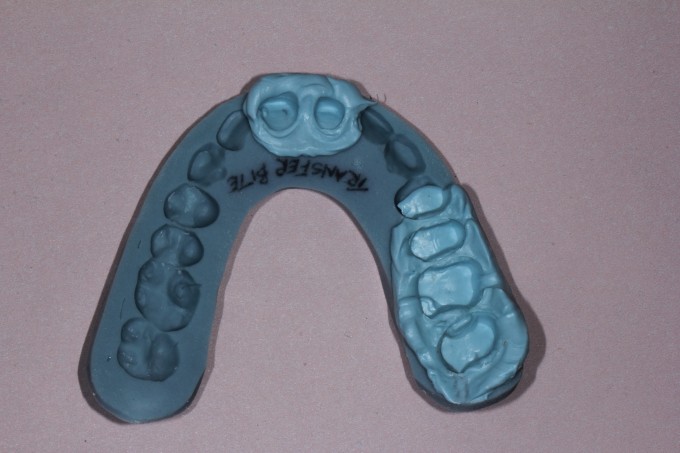
If you want to break your cases on quadrants, use transfer bite.
Here is a picture of transfer bite on one of my full rehabs cases:
On 10/13/2017 at 5:27 am, Trent Redfearn said... So if you do need to prep the molars would you not prep them at first, get the wax up to stick and then go back and prep? Also when would you take your buccal bite?
No I am doing the molars at a separate appointment after everything else is seated for a case like this. I've realized that the goal whenever you do a case like this is to get the waxup model itself to stitch to the preps. That is critical to the best result. I will generally scan the temps as well just in case, but your design and execution will be monumentally easier if you don't have to design and biocopy off your temps.
I see you mentioned that we're more like full coverage veneers. Is the final thickness of the emax at 0.7mm? Are you worried about any issues or is the thought process less tooth reduction therefore less tooth flexure and less chance of fracture?
I have certainly done emax press with finish lines at 0.2 or less and had 1mm or less of reduction with no issues.
Lastly, did you use the smile design option or was it not necessary?
Hi Jeff. Enamel is key... if you have a lot of it you can get away with thinner restorations.
I did not use smile design.
Trent-
If you are going to increase VDO, the process is generally the same on the upper... leave molars untouched and do bicuspids and anterior est first... then do upper posteriors to plane of occlusion and then lowers to match.
