
Difficult Central Case

I wanted to post a fairly difficult central incisor case that I just completed...
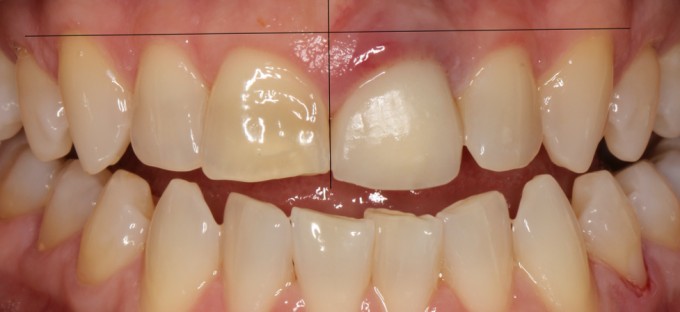
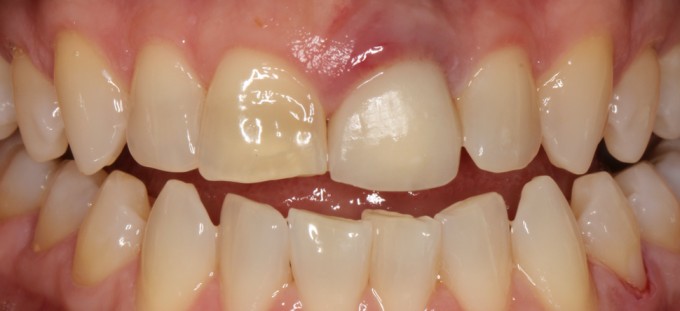
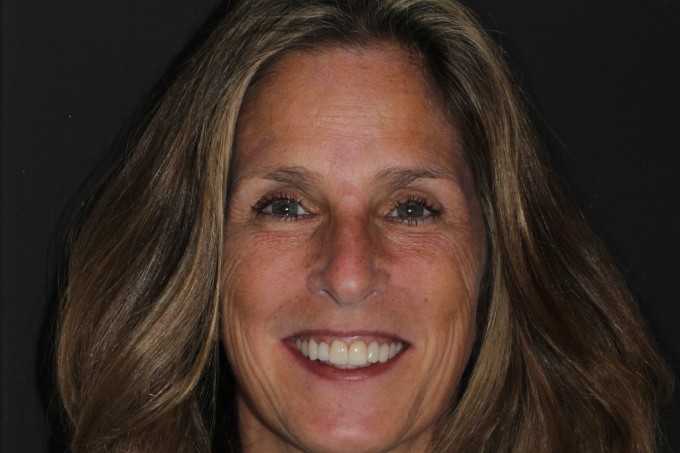
This patient came to me wanting to improve her smile. She had some chipping and wear on tooth #8 and an old PFM on tooth #9 that had a previous RCT.

The tissue was extremely inflammed on #9 and the margin was quite subgingival. I determined that she had a biologic width invasion here that was likely going to need osseous crown lengthening....
So first, I planned the case out using simple photoshop smile design...
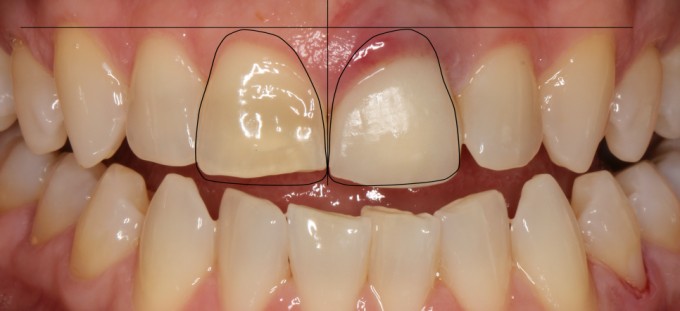
Here is where she needed her gingival crest to be on 8 and 9:
Here is where I planned where her teeth needed to be to have correct proportions. Tooth #8 needed to be lengthened slightly and the incisal edge on #9 was correct based on her lip at rest photo:
Then I quickly morphed the teeth into the correct position using photoshop:
So... the plan was the following:
- Prep and provisionalize the teeth to the correct position using a diode laser to recontour the tissue based on the original plan
- Send her to the Periodontist to perform osseous crown lengthening (mostly on #9) to get the tissue to respond and eliminate the Biologic Width problem
- Allow the tissue to heal
- Fabricate the final restorations
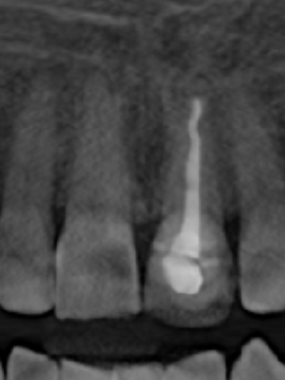
After removing the crown on #9... I got another suprise... ouch:
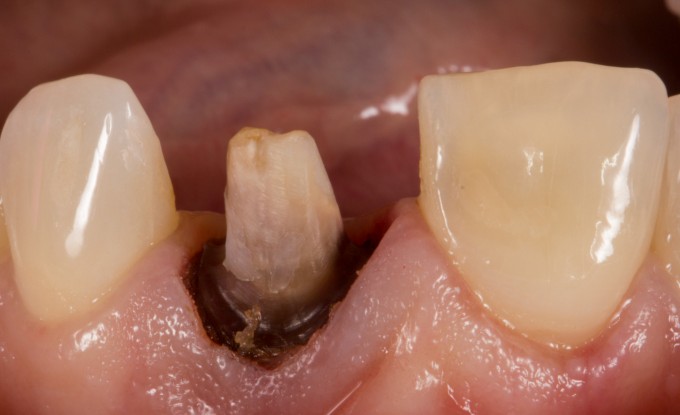
I opaqued the tooth to try the best I could to block it out and finalized the preparations on both 8 and 9:
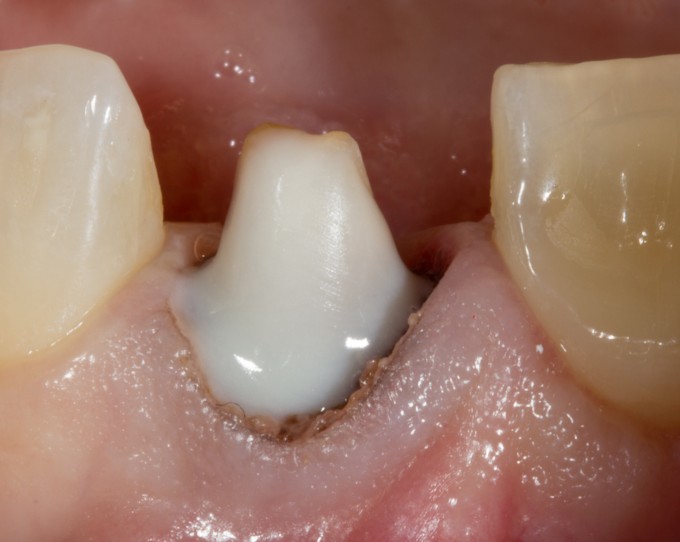

I made the provisionals on 8 and 9 and sent her to the periodontist:
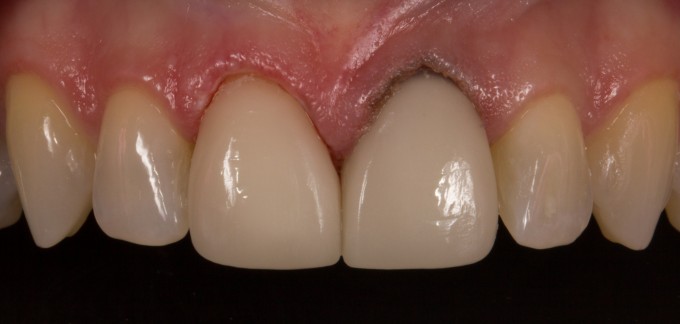
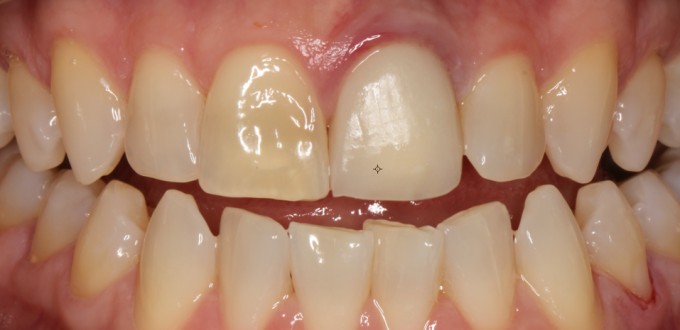
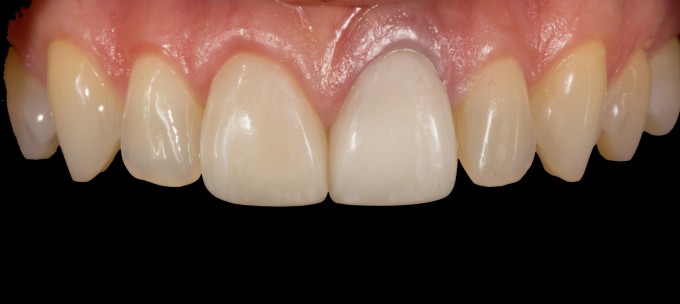
Two months later after healing, we did the final restorations out of e.max MT shade M1:

There was still a little darkness coming from the root of #9, but overall I was very pleased (and the patient was thrilled). If you look at the smile picture, it doesn't show :)
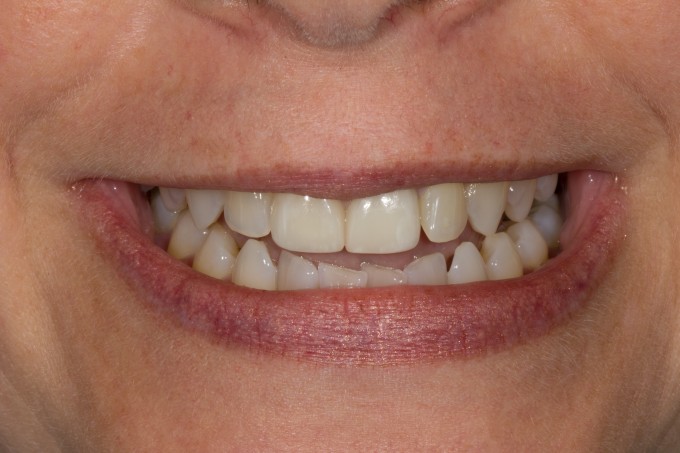
This was a long and difficult case to do... but I feel because it was planned properly and the patient understood what was needed, it turned out pretty good!


Absolutely gorgeous! Well done and thanks for setting a high bar!
Question on bonding of the crown ... Anyone have any idea of bond strength of the emax to the opaqued core? Obviously there is little to no bonding directly to the tooth (dentin at the margin?) so the majority of the surface area is bonding of the resin cement to the opaqued resin. Is that significantly less bond strength than bonding to dentin directly? I've always been curious about the bond strength change (if you have to lay a core, or a liner and are losing surface area of resin cement to dentin. Here of course, it's also relying on the mechanical retention of the prep itself.
Just curious!
Steve

Very nice esthetic result. #9 is a little lighter but considering what was underneath it's a masterpiece.
What did you do to control the occlusion? The patient has wear patterns on the lowers and previously worn centrals. The given the RCT and minimal good tooth structure on #9 what's your prognosis?
On 4/12/2017 at 11:30 am, Darin O'Bryan said...Very nice esthetic result. #9 is a little lighter but considering what was underneath it's a masterpiece.
What did you do to control the occlusion? The patient has wear patterns on the lowers and previously worn centrals. The given the RCT and minimal good tooth structure on #9 what's your prognosis?
I was nervous about the darkness on #9 so I used a very bright opaque resin cement... overdid it just a little bit :)..... you cannot tell in the mouth though. It's pretty close.
I talked to her about the occlusion and we are going to monitor it. I just reestablished guidance on her and will see. She is definitely doing something though for sure. She is also in a new appliance to try and minimize problems.
On 4/12/2017 at 11:24 am, Steven Gray said...Absolutely gorgeous! Well done and thanks for setting a high bar!
Question on bonding of the crown ... Anyone have any idea of bond strength of the emax to the opaqued core? Obviously there is little to no bonding directly to the tooth (dentin at the margin?) so the majority of the surface area is bonding of the resin cement to the opaqued resin. Is that significantly less bond strength than bonding to dentin directly? I've always been curious about the bond strength change (if you have to lay a core, or a liner and are losing surface area of resin cement to dentin. Here of course, it's also relying on the mechanical retention of the prep itself.
Just curious!
Steve
I have really no idea on that. It's a good question. In the end, I think most anterior full coverage crowns have enough retention form that it's not an issue. Also, since the core in this case is composite, I think that bonding to that is actually quite good.

Mike, really nice. Do you ever use the pink opaquers? I have really been liking them for these situations. The pink seems to counter the brightness a bit.
On 4/12/2017 at 11:24 am, Steven Gray said...Absolutely gorgeous! Well done and thanks for setting a high bar!
Question on bonding of the crown ... Anyone have any idea of bond strength of the emax to the opaqued core? Obviously there is little to no bonding directly to the tooth (dentin at the margin?) so the majority of the surface area is bonding of the resin cement to the opaqued resin. Is that significantly less bond strength than bonding to dentin directly? I've always been curious about the bond strength change (if you have to lay a core, or a liner and are losing surface area of resin cement to dentin. Here of course, it's also relying on the mechanical retention of the prep itself.
Just curious!
Steve
It really is a great result.
I would think the weak link is the opaquer to the dentin, as revealed by the typical scenario of patient arriving, crown in hand with buildup in crown. I try to create a bit of mechanical retention of the opaquer if possible to help with retention, that way, when the cement bonds to the opaquer, there is some undercut mechanical retention of the crown besides the adhesion to the dentin of the opaquer.

Awesome case Mike! Try the pink opaquers from Cosmedent. I think you will really like them for the dark stumps like this
I have the pink opaque and I use that as well on some cases. Here, not much would have helped at the cervical because it's the root that was showing through.
I overshot the value with the cement slightly, but didn't know it until I looked at pictures. I thought it was perfect clinically... LOL

On 4/12/2017 at 1:41 pm, Mark Stockwell said...Beautiful... planning and patience won that race...
Mark
Thanks Mark... that was the point of showing the case. Planning is key and when I did that I knew it was an multidisciplinary case with Perio (I don't do crown lengthening). You could not rush this case at all

Mike, I would probably remove old core material and build a new one, it seems to me there is a leak. Show the picture a year later please, I just want to see how tissue will respond. Thank you for the case! Gregory
Will do Gregory. I always take recall pictures at yearly intervals of most cases that I do to track them.
I will say that the patient said this is the first time in 15 years that her guns don't bleed! It was a big improvement

Mike I know you have done some videos showing how to use the photoshop program to do what you did for the case, can you share that link? also is this something I can do on an ipad because I just got the new 5th generation ipad and wanted to see what program I should get. thanks!
Awesome Mike,
Simple design using photo shop is the video James. See you guys tomorrow!
Carrie

On 4/12/2017 at 8:26 pm, Brian Chan said...what were the provisionals made out of and what cement/shade did you use?
Hi Brian-
First of all... to you photoshop question: I will make a video of this photoshop design for you to follow and learn what I did. I also am going to make a video of the design that I did and post the .rst file so you all can practice designing yourself for practice. I realize I was off a little bit on #9 with the shade, but they are symmetrical... and that is the key... I want you all to be able to learn this.
The provisionals were made out of Vita Mk II because I was testing the shade. I didn't end up using that, I used e.max MT shade A1. The Vita provisionals actually were starting to crack towards the end because I cemented them with tempbond. I just wanted to get an idea of the shade first.
I bonded #8 with Variolink Veneer +1 and #9 with Variolink Veneer +3. In the end, I should have not used +3 on #9.... but clinically I feel it looks great.

Mike, what sequence of bits do you use on a daily basis for your preps? That prep looks like it has the finish if a recently waxed car!
On 4/13/2017 at 4:03 am, Paul Doughty said... Mike, what sequence of bits do you use on a daily basis for your preps? That prep looks like it has the finish if a recently waxed car!
I just use 3M soflex disks to polish


Thankful and always impressed that you share all the steps in your thought process! Great education and will be applying to my patient this morning. Always nice when patient can see and appreciate results.
